In part 2, we will go through how to take inventory in the mobile app. Before starting the inventory, an administrator needs to have created the location or locations where the inventory will take place. A location is a digital representation of a physical building, office, or similar. At the bottom, you will find additional sections if you want to explore Palats in more detail.
💙 Please read our Tips & Tricks before you start taking inventory!
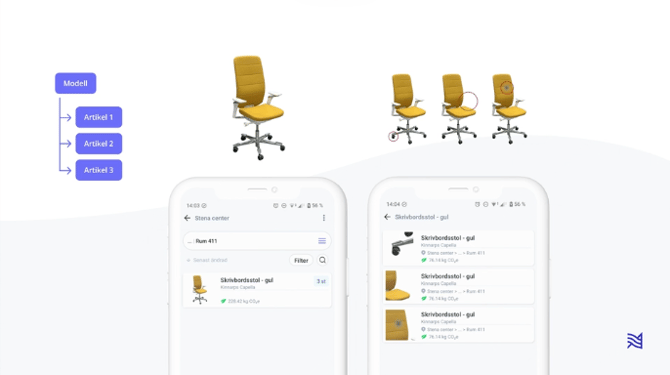
For whom?
This section is intended for both administrators and members, who have permission to take inventory at one or more locations. Depending on how your organization operates, you may also be required to post an ad on a marketplace in connection with the inventory.
The difference between Model & Article
In Palats, we work with models and article, and here we explain the difference between these concepts.
Model
- The model is a type of product of which there can be many unique instances (article).
- Model-specific fields are shared across all article/instances of the same model.
- If you have the same type of armchair in another color, it is counted as a different model.
Article
- The article is the actual piece of furniture — a specific instance belonging to a model.
- The article has it´s own unique attributes, such as condition and location.
- Article belonging to the same model therefore share the model specifications but have unique article specifications.
💙 Tip! If your organization has a standard assortment, you can create your models before starting the inventory. This way, your models will be available in your model library to select from, which speeds up the inventory process. See the video below.
Take inventory
- Select a location where to take inventory
- Click + to start the inventory
- If you are taking inventory on a floor plan, you need to mark the article on the plan
- Click Add photo and take one or several clear pictures
- Click Add QR codes, scan a QR code on the roll, and attach one to each article
- Choose a category or use the model library if you know the model has already been inventoried
- Fill in the specifications for the model and the article, it´s fine to leave fields empty
- Select the number of article (number of individuals of the model) you want to submit and click Finish & Save article
- Check common properties for your articles
- Click Review articles
- Continue to Edit copies to ensure that all articles have a location, a QR code and a correct condition. Finish editing
- Approve and Save
- Your articles are now inventoried!
Model library - create models before taking inventory
Change the location of an article
Previous step
Step 1 - Create a new location in the web app
Next steps