
Import from Revit
Palats supports importing a Schedule from your Revit drawing. The Schedule can be used to assign destinations to articles in your project inventory, which speeds up the detailed planning for your relocation.
Make sure your project is set up to Decide destinations in CAD. This setting is found in the project settings, in the tab "project inventory".
1. Assign Type Marks to the models in your project. Use the "Mark map"-tool at the top right of your project. As you're assigning marks in Revit, remember to update your Palats project to mirror Revit. This way you can keep track of which actual model you're drawing in your rooms.
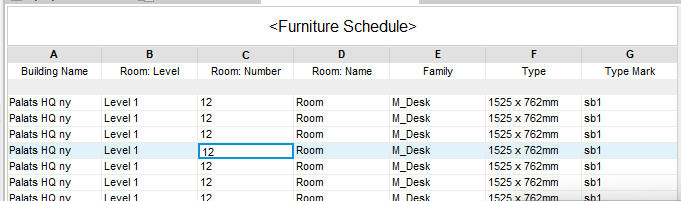
2. Set up a Schedule in Revit. The Schedule must include the following fields:
- Room: Level
- Room: Number
- Type Mark
In addition, if your project has more than one location, you must include Building Name as a column. You can optionally include an Amount column if some rooms contain many articles.
Example of a valid Schedule that can be imported in Palats:
3. Export the Schedule in Revit. Use the top menu: File > Export > Reports > Schedule. In the Export Schedule popup, uncheck Export title and Export group headers, footers, and blank lines.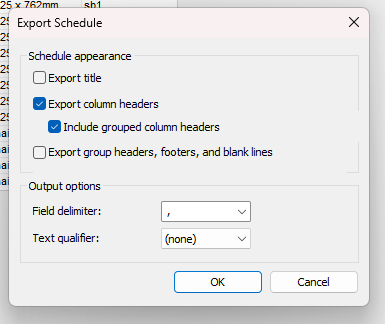
4. Go back to Palats and use "Import from CAD". Drag and drop the CSV file into the box. The system will show you a preview of which articles will have an assigned destination.
5. Done! Destinations have now been set.
Import from Excel
If you're using a different software that doesn't support Schedule exports, you can also set up your destinations in Excel.
Just like with Revit, you first need to make sure your project is set up to Decide destinations in CAD. This setting is found in the project settings, in the tab "project inventory".
The simplest way to get set up is to use the example file that's available in the Import from CAD slide-over. This file has the correct format and columns preset for you, and you can simply create new rows for every room and mark combination.
If you want to start from scratch, you need to make sure your Excel file has a single sheet (we only import one sheet) and that table headers are on the top of the file, row 1. This means Building Name should be in cell A1.
Include the following columns:
- Location
- Floor
- Room
- Mark
- Amount
The "Room" column should include either the room number, or if you aren't using room numbers, the room name. The "floor" column should only include the floor number.